Showing posts with label Tutorials. Show all posts

27 February 2014

How To Invite all Friends To Facebook Page Code 2014

Hello my friends, when we create an event or page on facebook so we see an option to invite the friends for that one. But we face a problem we have to invite all friends one by one  and this take too much time, so I make a method to Invite all Facebook friends with just simple code.This code is working 100%.
Requirements:
  • Facebook account 
  • basic knowledge about browsers
Steps for Firefox:
Step 1 : Open Your Facebook Page and Click on See All Near Invite box
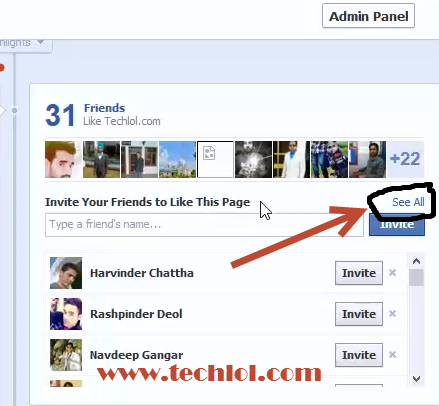
Step 2 : When You Click on Popup And select Search All Friends And Scroll down 
Step 3 : When You Scrolled down Right click and Click on Inspect Element

Step 4 : Now you See a new Window Bottom of the screen open
  • Select Console 
  • Paste Code
var inputs = document.getElementsByClassName('uiButton _1sm'); for(var i=0; iinputs[i].click(); }
  • \  Press Enter

And Now You see Your Invitation Sending wait for some time When You see Invite Sent on All Contacts click close Congrats Your Invitation sent
Watch Video Tutorial Full


26 February 2014

How To Hide WhatsApp Last Seen Timestamp on iPhone

Hide WhatsApp Last Seen Timestamp on iPhone
Hello Friends WhatsApp has got to be one of our favourite and most used app. However, we have a question all the time – how do I hide my WhatsApp Last Seen Timestamp in Iphone. Finaly Now there is a way to Hide your whats app last seen timestamp.The latest version of WhatsApp 2.8.1 gives you the Option in the setting of whatsapp.
If this tutorial not works Then Please Update you whatsApp or wait For auto update.


Steps To Hide or disable WhatsApp “Last Seen Timestamp” on iPhone
Step 1: Open WhatsApp and tap on Settings from the menu (bottom)
Step 2: Tap on Chat Settings
Hide WhatsApp Last Seen Timestamp on iPhone
Step 3: Scroll down and tap on Advanced
Hide WhatsApp Last Seen Timestamp on iPhone
Step 4:  Switch OFF Last Seen Timestamp
If you Like Our Post Please Like us and share us

23 February 2014

Speedup Youtube Buffering Speed With YouTube DNS Servers

Increase Youtube Buffering Speed With Youtube dns


Hello Friends Welcome to Techlol.com We feel very irritate when we play YouTube video and its start buffering so don't worry in this tutorial I will tell you a easy and simple way to increase the YouTube  video buffering.In part-1 I explain ‘YouTube Feather’ If you don't know about Click here to read that first :  How To Increase Buffering Speed In YouTube Part-1
In This tutorial we will increase YouTube video speed with YouTube DNS So lets start Its also a good way to increase YouTube video speed.


Steps : 
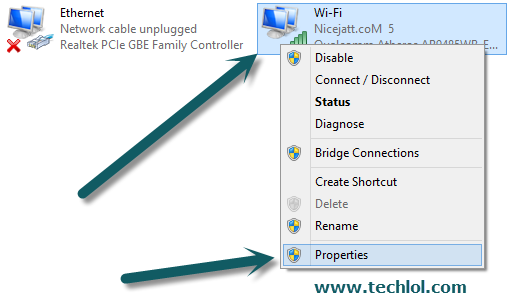
1. First of all open Control Panel > Network and Internet > Network Connection

Increase Youtube Buffering Speed With Youtube dns

1.       Select the active connection I connect with WiFi Right Click on it and Click on Properties

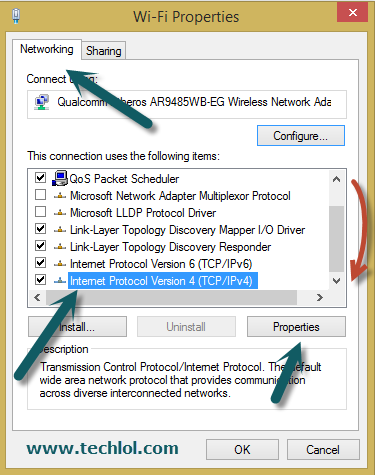
2. Now Scroll down the scroll bar  select  Internet Protocol Version 4(TCP/Ipv4) and click on Properties then a new popup open


Increase Youtube Buffering Speed With Youtube dns
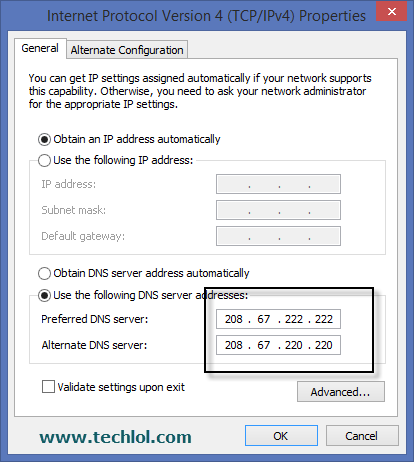
3. Now Select Use The Following DNS and Enter
Click on Use the following DNS server addresses
Set  Preferred DNS server to 208.67.222.222
Alternate DNS server to 208.67.220.220
Increase Youtube Buffering Speed With Youtube dns

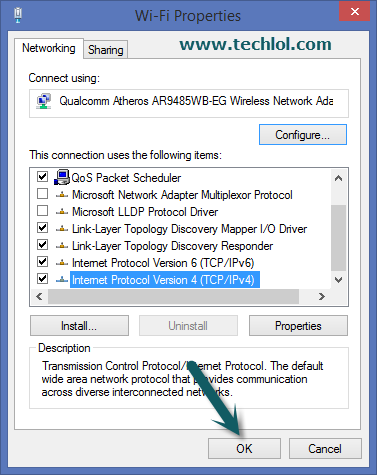
then click on ok
 

Increase Youtube Buffering Speed With Youtube dns
 Please like our Facebook page and subscribe our YouTube channel 

How To Increase Buffering Speed In With YouTube Feather


Increase Youtube Buffering Speed With Youtube dns


Hello Friends Welcome to Techlol.com You feel very irritate when we play YouTube video and its start buffering so don't worry in this tutorial i will tell you a easy and simple way to increase the YouTube  video buffering speed.IN this part we will discuss  YouTube's 'Feather' Its the best way to increase YouTube buffering speed using this method You won’t see too many comments. You won’t be able to like or dislike the video. You will get  5 suggested or related videos
Read Also : 

Steps :
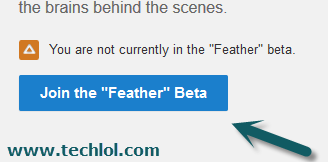
1. Open  https://www.youtube.com/feather_beta and click on Join The Feather" beta. 
Increase Youtube Buffering Speed With Youtube dns

2. Now open any YouTube video and you will see the speed is increased  and you will see a new option in your YouTube Which i display in image 
Increase Youtube Buffering Speed With Youtube dns


Just this once : click on this link if you just want to see this video in light version
Permanently : Click on this link if you want this lighter version for YouTube permanently.

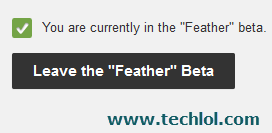
3. If You click on permanently and want to leave the ‘Youtube Feather’ again open  https://www.youtube.com/feather_beta
Increase Youtube Buffering Speed With Youtube dns


And click on Leave the “Feather” Beta
Read also : Speedup Youtube Buffering Speed With YouTube DNS Servers

13 July 2013

How to forward your mails in Gmail account

how to forward mails in gmail account

How to forward your mails in Gmail account

Hello my Friends Today I share a very interesting method to you. My friend has more than 5 email accounts on email and he always check all account in morning and spent too many time so I search a method for him but I see that maximum persons make more than one email account so I make this tutorial for them who have more than one account. In this method i tell that how you check all you email accounts in one account. In this tutorial you learn very interesting topic so let’s start.
First we are set this email forwarding method in Gmail.


Steps:
1. Open another Gmail account.
2. Click on setting after click on icon show in image.
gmail setting
3. After Click on setting we have to click on “Forwarding and POP/IMAP  link then Add a forwarding address button.            

forward mails
4.After Click on “Add a forwarding address” a new popup open here we have to fill our main email where we want our mails come and click on NEXT button
add a forwarding address

Read Also : How to change your gmail password

5. Then a new pop up open here we have to click on PROCEED. 

confirm gmail address
6. 
Then A mail will sent on you email which you fill    

check gmail inbox

7.  Then copy the confirm Code and fill in email which you want to forward and click on verify button.

verify confirm code

8.       So now this is the last step          

·         Keep Gmail’s Copy in the Inbox
·         Mark Gmail’s copy as read.
·         Archive Gmail’s copy
·         Delete Gmail’s copy
how to forward your emails in gmail account


More methods Coming soon

like  How to forward yahoo mails to gmail,how to forward gmail mails to yahoo,how to forward,how to forward hotmail mails to gmail or yahoo or many more methods.

if you have any query post in comment.please share our posts to your social accounts so that another can also enjoy this post and increase knowledge.


2 November 2012

How To Add a Custom Domain To Blogger Tutorial With Images

Hello guys, So today I'm going to show you how to add a custom domain name to blogger blogs. this tutorial will be from Creating the blog, to adding the domain and using it. =)
just some steps help you to add the domain on your blogger.
Step 1:
Open blogger and click on setting
How To Add a Custom Domain To Blogger Tutorial With Images
Step 2: After Click on setting Click on add a Custom Domain link.
How To Add a Custom Domain To Blogger Tutorial With Images


Step 3: 
open your domain panel and click on domain setting set ip
Add two CNAME records. For the first CNAME, where it says NameLabel or Host enter "domain name" and where it says DestinationTargetor Points To enter "ghs.google.com" . For the second CNAME, enter "2PYFB4SEOPQP" as the Name and 
"gv-NT2MIFOLFWFDAS7SZR3FWDHUH2G6OZS7RGDCXHZ2I5WZQIVHO47Q.domainverify.googlehosted.com." as the Destination. See our detailed instructions on providing CNAMEs for various registrars. If yours isn't listed, or if you run into other difficulties, contact your registrar directly and they can help you out.

How To Add a Custom Domain To Blogger Tutorial With Images


A-records (optional)
The following action links your naked domain (example.com) to your actual site (www.example.com). If you skip this step, visitors who leave off the "www" will see an error page.
Enter your domain name in the format example.com, and list the I.P. addresses shown below in the "A" section. You'll need to create four separate A-records which point to four different Google IPs.
216.239.32.21
216.239.34.21
216.239.36.21
216.239.38.21
Step 4: Switch to Advance menu and add you domain name here.if not working wait 24hrs and try again.
How To Add a Custom Domain To Blogger Tutorial With Images
Step : 5 Now add Domain and click on save wait 24 hrs you domain working fine
How To Add a Custom Domain To Blogger Tutorial With Images
If your domain working with blogger come back to our site click on like and post some comments about our post

How to Register Domain name free tutorial with images

Hello Friends now i am telling you how we get a free domain name.Domain is the identity of a person on world wide web.there is some simple step to get free domain name for you.
First of all open Dot.tk website
Step 1 : Enter your domain name which you want to set.

28 October 2012

How to change GMAIL password with screenshot ( Tutorial )

How to change Gmail password tutorial
How to change Gmail password
Hello friends today i tell you how we change the password of our Gmail account tutorial with snapshots.this is too easy to change the password of Gmail our blog always give you easy tutorial and security tips .
If you want to change your Gmail password just some steps will show you full information.please share us on social site s and like us on facebook.
www.facebook.com/nicejattz
www.twitter.com/nicejattz